Integration with Tilda
Automatically create files through a form on your Tilda website. Visitors to your website can enter their name and other information and receive a ready-made file. If necessary, the file can be sent to the recipient's email.
Creating a form in Tilda
To submit requests for file creation, you need to create a form on your website. This form can be located both in the Personal Account and in the public part of the site. You can add any form available in the Tilda blocks catalog.
Form settings
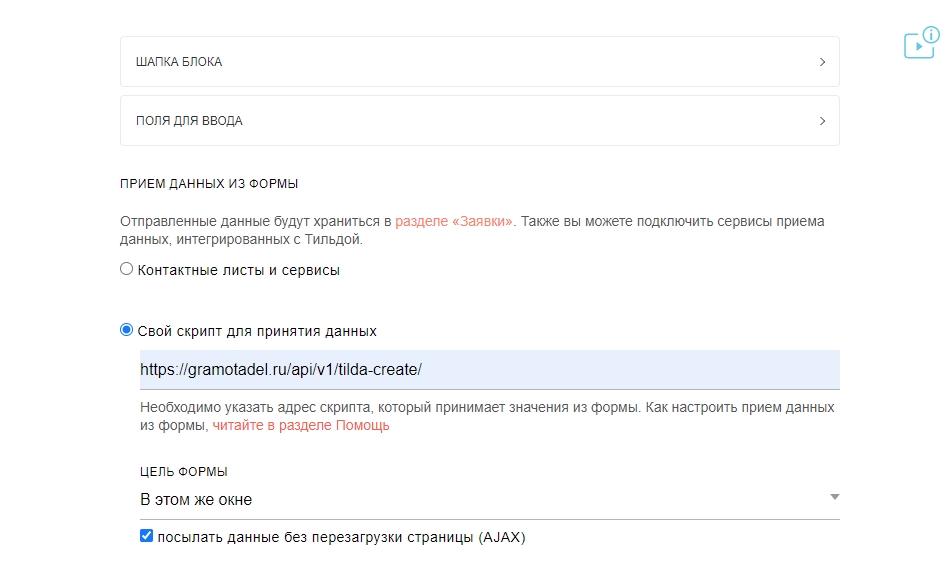
You need to click on the "Content" button in the left corner of the form. Then, click twice on the "Receiving data from the form" header, and an additional switch "Your script for accepting data" will appear. Select it. In the input field, insert the following address:
https://dimaker.app/api/v1/tilda-create/
 Form settings - receiving data
Note that you need to send data without reloading the page (AJAX).
Input fields
The document in DiMaker should have at least one variable for replacement, for example %name or %course. The variable should be written in Latin. Cyrillic %name or %class cannot be used. Email address is %email.
In the form content, in Tilda, you need to add "Single line field" (or, for example, "Name", "Email"). In the "Field title" field, write what data is requested, for example, "Full name", And in the "variable name" field, enter the variable name without the % sign from the document + the mask_ prefix. For example, if the document has the variable %name, then the variable name in Tilda is mask_name, if the document variable is %course, then the variable name is mask_course. The visitor-entered data in these fields will be replaced with the corresponding variables in the document text. 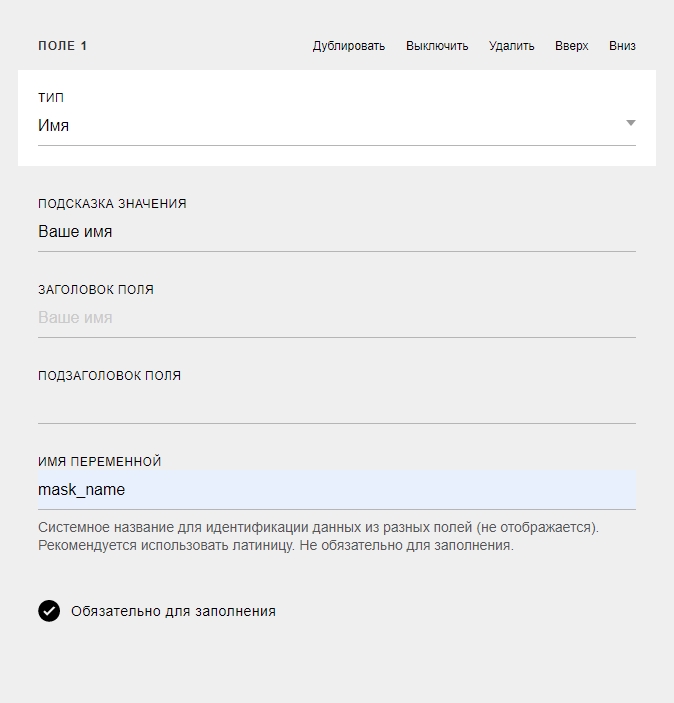 Adding a field mask_name, which corresponds to %name in the document
If it is necessary to send a ready-made file by email, and the form is publicly available (not in the Personal Account), then you need to add an Email field for entering an email address. In this case, the variable name will be "mask_email".
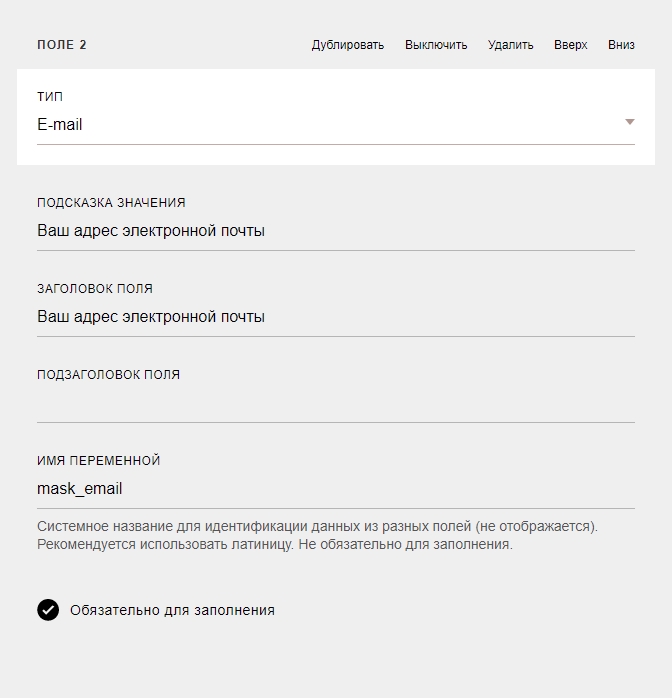 Adding a field mask_email, which corresponds to %email in the document
There can be any number of such input fields and variables in the document. You can request data from the visitor and then apply them to the ready-made file.
If you need to insert the current date, a random number or other data - you should use functions.
Hidden form fields
Next, you need to create several hidden fields. They ensure the identification of the form, indicate which document to use, which folder to save the file to in Drive, and so on.
The form must have at least two mandatory fields and, if necessary, several non-mandatory ones.
Mandatory form fields are marked with an asterisk.
-
secure *
Access token. Obtain it from the necessary integration with Tilda, from the "Token" field.
-
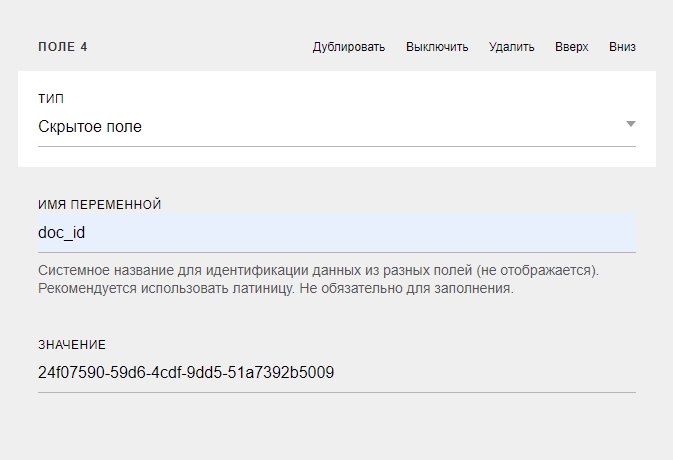
doc_id *
The document ID must be obtained from the address bar when the document is open. The ID is 36 characters long and does not contain slashes. The document should not be in the trash, but can be located in any folder in Documents.
-
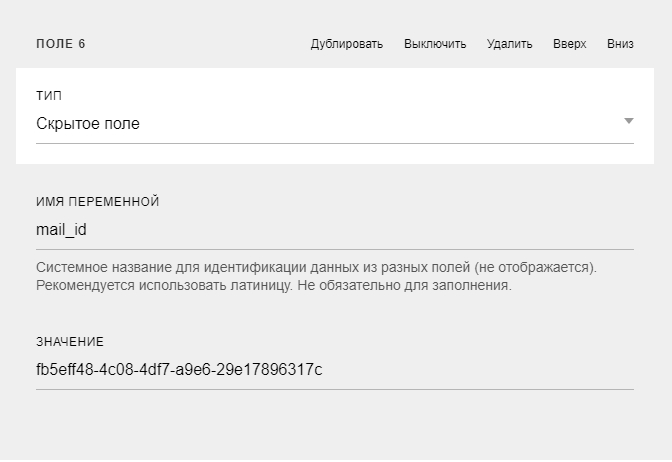
mail_id
The email template ID must be obtained from the address bar when the email template is open. The ID is 36 characters long and does not contain slashes. If the variable is not transmitted, the email will not be sent.
-
email_send
The time to send the email with the file. It can take one of the following values:
onfinish - Send all emails after creating all files in the group (by default)
oncreate - Send emails immediately after creating the file. When creating a single file, onfinish and oncreate are identical.
timeout - Send emails after a period of time. In this case, you need to pass two more parameters:
email_timeout_value - numeric value of the time interval at which to send emails, an integer value
email_timeout_value - the unit of measurement of the time interval. Can take the value of "m" (minutes), "h" (hours), "d" (days).Or, to specify the exact time of sending, pass the time in unix time format in email_timeout_timestamp. If both variables are passed, then priority is given to the last variable. -
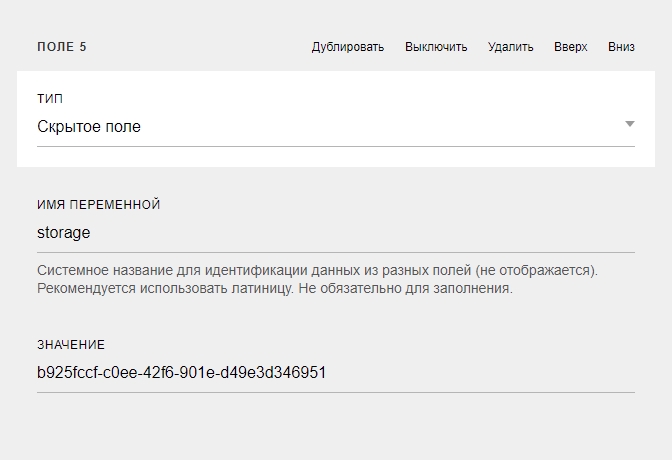
folder_id
The folder to which to add files to Drive. If the folder does not exist, it will be created automatically when the first file is created. The folder ID should be taken from the address bar when the folder is open. The ID is 36 characters long and does not contain slashes.
-
page_id
If the document has multiple pages, the page_id field can transmit the ordinal number (starting with 0) or the numbers of the pages (comma-separated) to be used to create the file.
Thus, the form must have two mandatory hidden fields. These are the Secure field.
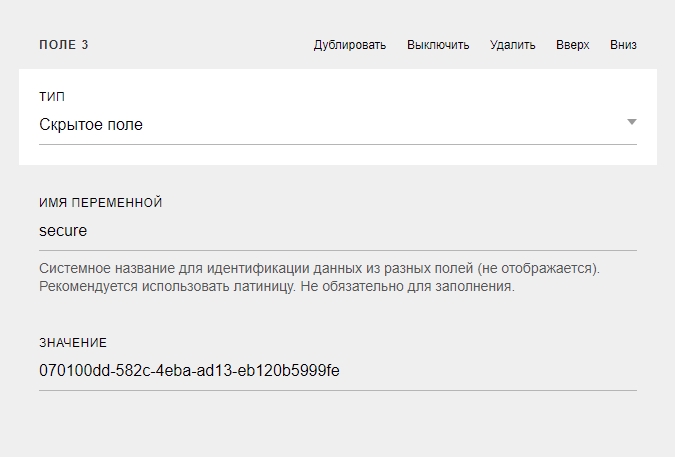 Hidden Secure field. The field value is taken from the settings.
And the doc_id field.
 Hidden doc_id field. The field value is the document ID from the address bar.
Additionally, if you need to send the file by email, you need to indicate the email template ID.
 Hidden mail_id field. The field value is the email template ID from the address bar.
If you need to add the file to a specific folder in Drive, you need to indicate the folder ID.
 Hidden folder_id field. The field value is the folder ID from the address bar.
Authentication
Authentication parameters determine who can use the form.
- Without authentication. Any visitor can fill out the form. If there are mask_email or mask_phone fields among the form fields, this data will simply be saved with the file without verification.
-
By email. This type of authentication allows verifying that the entered email address belongs to the visitor by sending a one-time code to their address. If the code is not entered, the file will not be created.
To use email authentication, the form must have a mask_name field and the "Required" switch must be on, or the form must be placed in the Personal Account.The "Sender" parameter allows specifying which Sender to use for sending the email with the one-time code.
List authentication. With this parameter enabled, not only ownership of the specified address is verified but also the existence of that address in a separate table. This allows identifying the circle of persons authorized to use the form in advance. To do this, click "Configure" directly under this parameter. In the opened window, select the table (or document with the table) where the list of addresses is stored, the column in which they are specified. The "Delete row" switch allows specifying whether to delete the row with this address from the table. Thus, the specified table will only contain those addresses that have not yet been used for authentication.
-
By phone number. This type of authentication allows verifying that the phone number belongs to the visitor by sending a short call to the number. The visitor will need to enter the last 4 digits of the reverse number. If this is not done, the file will not be created.
To use phone number authentication, the form must have a field named mask_name and the "Required" switch must be on.List authentication. With this parameter enabled, not only ownership of the specified phone number is verified but also the existence of that number in a separate table. This allows identifying the circle of persons authorized to use the form in advance. To do this, click "Configure" directly under this parameter. In the opened window, select the table (or document with the table) where the list of phone numbers is stored, the column in which they are specified. Numbers must be exclusively in international format, without any characters except "+" at the beginning of the number, for example - +71234567890. Extra characters can be removed from the table using the "Find and Replace" function. The "Delete row" switch allows specifying whether to delete the row with this number from the table. Thus, the specified table will only contain those numbers that have not yet been used for authentication.
Allow creating only one file
If this setting is enabled, the visitor will be able to create only one file with the entered email address or phone number. With authentication enabled, they will need to first confirm ownership of the specified address or number. With authentication disabled, the visitor will only need to enter a different address or number to use the widget again. Thus, the most reliable way to prevent multiple illegal uses of the widget is authentication through a pre-defined list. If this is not possible, authentication by phone number allows to reduce the number of repeated unauthorized creations through the widget.
Send yourself a file after creation
The file will be sent to your account email immediately after creation. In the "Email Template" field, you can choose which template to use for sending. Separately in Email Templates, you can create a separate template for sending Emails to your account email. If you write a variable %data in the email text, all file data will be added to this table.
Integration Parameters
- Allow Requests. If the switch is off, the form will not work.
- Domain, where the form is located. The form can only work when the site is open on https. In the site settings on Tilda, you can connect a free certificate and redirect from http to https.
- Accept Requests only from the Profile. If the form is in the Tilda Profile, then you need to enable this switch. If in the public part of the site - disable it.
Other settings relate to placing a form in the Tilda Profile and are discussed below.
Form Functionality
Now you just need to place the code on the form page. You need to completely copy the code from the integration page and paste it on the appropriate pages of the site. To do this, in Tilda, open Page Settings - Additional - Code in HEAD and paste it there. Do not insert this code on all pages of the site, but only on pages with the form. If you need to prevent the user from changing their email, then only the first line of the code (link) should be inserted on each Profile page. You will also need to create an index Profile page.
Now you can open the published page and check the form's functionality. A file will be created and displayed in a pop-up window for download. If this does not happen, you need to check the site address in the integration parameters, as well as the correctness of secure and doc_id.
Using data from Personal account
If the form is embedded in the Personal account, you can use the user's name and address from their Personal account.
To do this, you need to create a hidden field with the field name "mask_name" (or another name corresponding to the name in the document), and in the value write "ma_name". In this case, the user's name will be automatically inserted into this field from their Personal account.
Creating a file with one button
The form may contain only one button, clicking on which can lead to the creation of a file, without the need to fill in fields (for example, when the name is taken from the account data). Since Tilda cannot send a form with only hidden fields, for example, you need to create a checkbox with consent to data processing.
My certificates
To display my certificates, you need to create a form in which, as described above, specify "Your script for accepting data". Then add hidden fields "secure" and "doc_id". In the last field, specify the value "all". When this page is opened in the Personal account, the visitor will see a list of all certificates with the ability to download them instead of the form.